A review of Game Maker’s key components and supporting technologies
A computer game is video game played on a personal computer. In computer games, one or more players interact and compete in a make-believe world. Game Maker is a software development tool that provides a robust development environment designed to support the creation of computer games. It uses icons that represent events and actions that control the movement and interaction of objects within games. Using these resources, Game Maker assists you in creating computer games without requiring that you know how to program. At the same time, it provides a scripting language that experienced developers can use to create advanced games. In this chapter, you will learn more about Game Maker and how it works.
An overview of the major topics covered in this chapter includes:
A review of Game Maker’s key components and supporting technologies
Instruction on how to install Game Maker
An introduction to the Game Maker community and how to participate in it
A demonstration of how to load and execute Game Maker applications
From its origin in the early 1970s with games like Pong, Space Invaders, Breakout, and Asteroids, to the latest generation of games like World of Warcraft, Call of Duty, and Guitar Hero, computer game development has always been serious business. Over the years, game play has evolved from single-player arcade games to games involving thousands of players from around the world played on the Internet. Games and the platforms they are played on also have evolved and changed over the years and now include home computers, PDAs, cell phones, game consoles, etc.
The video game industry generates more than $10 billion in revenues every year. Individuals with game development skills are in high demand and can demand lucrative salaries. To meet this demand, colleges and universities like the University of Southern California, ITT Technical Institute, and DeVry are creating degree programs in video game design.
If you are someone who is interested in breaking into this exciting field, there is no better place to begin than right here, right now, learning the basics of game design and development using Game Maker. On the other hand, if your aspirations are not so lofty and all you want to do is have a lot of fun learning how to create computer games that demonstrate your own personal sense of style and fun, then you’ll be pleased to know that Game Maker will suit your needs well. In fact, you may even find that the process of creating and developing computer games is actually a lot more fun than the playing of games.
Hint
It is important to know that most modern computer games sold today were developed by large teams of people, including programmers, graphic artists, audio technicians, and project managers, and probably took months or years to create with budgets of millions of dollars. Together, these people make sure their games have a good design and vision, backed up by exciting sound effects and stunning graphics, all of which is tied together using program code. The purpose of this book is not to try to teach you how to become a graphics designer or a sound technician, disciplines that can take years to learn and master. Still, you have to start somewhere. Using simple graphics and sound files included with Game Maker, along with the vast number of graphics and audio files available on the Internet, you will be able to produce some pretty fancy games all by yourself.
Most people think of computer game development and computer programming as a complex and mysterious process, requiring years of training and advanced technical education. This was once true but not any more. In recent years, a new generation of software development tools has appeared, specifically geared towards simplifying the process of developing computer games. One of the very best is Game Maker.
Game Maker was created for the sole purpose of facilitating computer game development. Game Maker was created by Mark Overmars, who initially released it as a graphics tool under the name of Animo on November 15, 1999. Since then it has evolved into a full-featured game development tool. Today, Game Maker is developed and supported by YoYo Games (www.yoyogames.com), which was established for the purpose of supporting the continued development of Game Maker.
Game Maker provides a great environment within which to learn how to develop computer games. Game Maker provides everything you need to create 2D and 3D computer games of all types. It lets you use a simple drag-and-drop approach to game development that allows you to get started without spending a lot of time learning how to program. This significantly reduces the complexity involved in game development, allowing you to focus on good game design instead of being bogged down in the details of computer programming.
Hint
Game Maker and the applications you make with it run on all versions of Microsoft Windows starting with Windows 2000 and later. At the time this book was written, the most current version of Game Maker was 7.0, which is the version used in all of the examples presented in this book.
Game Maker provides a framework that supports the development of computer games. This framework consists of a number of components, including:
The Game Maker IDE
The Game Maker game engine
DirectX
The Game Maker language
Game Maker’s integrated development environment or IDE provides a software development environment equipped with all the tools needed to develop new games and applications. Using its menus, toolbar, and a collection of built-in windows and editors, you can create a host of different types of games. A notable feature of Game Maker is its icon-based drag-and-drop approach to game
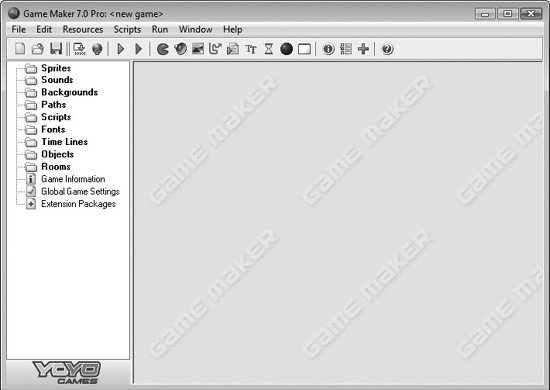
Figure 1.1
The Game Maker IDE provides a work environment within which you can create and test Game Maker applications.
development, which allows you to develop computer games without having to write a single line of program code.
As shown in Figure 1.1, the Game Maker IDE looks in many ways like a typical Windows application, with menus and a toolbar running along the top, and a list of folders containing application resources displayed on the left-hand side of the IDE. To the right of the folder listing is the main work area, where you will see and work on your games as you build them.
As you will learn in Chapter 2, “Getting Comfortable with the Game Maker Development Environment,” the Game Maker IDE also consists of a large collection of Windows and editors that enable you to create and edit graphics, work with sound files, design backgrounds, and outline the logic used to control the execution of your games.
A game engine is a software system that facilitates the development of computer games. It provides all of the core functionality required to render 2D or 3D graphics and to manage all aspects of computer games, including things like:
Managing the playback of sound effects and background music
Managing graphic animation and special effects
Managing the game’s use of computer memory
Executing program logic, including scripts (when included as part of games)
Determining when objects collide and how they should respond
The basic idea behind the development of game engines is that since all computer games share a common set of functionality, their development can be simplified through the use of a common framework that is responsible for managing common core components, allowing game developers to focus on the design and development of unique features that make their games operate. Without a game engine, game developers would be forced to create games from scratch, reinventing core game functionality common to every computer game, thus significantly increasing the amount of time and effort that goes into game development.
Game Maker’s game engine consists of a large collection of pre-written program code, referred to as functions, that you can add to your computer games. Each of these functions is designed to perform a specific type of task. By incorporating these functions into your applications, you save yourself the time and trouble of having to reinvent the wheel. These functions provide everything you need to display graphics, manage interaction with players, control game execution, and manage the playback of sound effects and background music. The functions are designed to work with a Microsoft technology called DirectX, which you will learn about in the next section.
DirectX is a Microsoft technology that enables the execution of commands that control and manage the high-end graphics and audio. DirectX manages the interaction required for games to access resources provided by your computer’s hardware. DirectX provides hardware-independent access to the computer’s input devices like the mouse, keyboard and, if present, joysticks, as well as the sound and video cards. Learning how to work with DirectX is no simple matter.
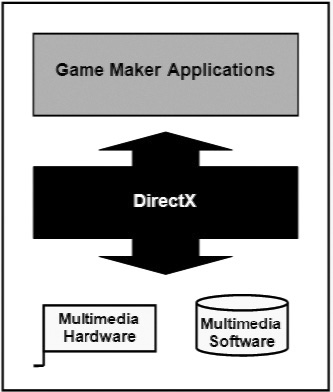
Figure 1.2
Understanding the role DirectX plays in supporting the development of Game Maker games.
Thanks to the game engines, DirectX is no longer a barrier to game development that can only be overcome by advanced programmers.
By calling on reusable functions that make up Game Maker’s game engine, you can create realistic games that leverage all of the multimedia capabilities provided by DirectX. This alleviates you from having to learn or even worry about how DirectX works and allows you to focus on what you are trying to create.
As depicted in Figure 1.2, the Game Maker game engine serves as an interface between your Game Maker applications and DirectX. Thanks to the Game Maker game engine, you can spend your time working on the fun part of developing computer games, ensuring a good design, and leave the rest to Game Maker, all without worrying about the inner workings of DirectX.
Hint
Microsoft initially released DirectX in 1995. DirectX has been updated many times since then. The current version of DirectX is DirectX 10. DirectX 10 ships with Microsoft Vista. Any computer you use to work with Game Maker and any computer the player uses to play your game on must run DirectX version 8 or higher. DirectX 8 was initially released in November 2000, so it has been around for a long time. As a result, unless you are working on a really old Windows computer, DirectX 8 or higher is almost certainly already installed, which means you do not have to worry much about whether other people will have the hardware needed to play your games.
Game Maker’s unique icon-based approach to game development allows you to create all kinds of professional-looking games without having to know a thing about computer programming. This frees you from having to learn and master the ins and outs of a new computer programming language and instead lets you focus all your attention on good game design. However, there are limitations to this approach, and after a while, you may find yourself wanting to push the envelope of Game Maker’s icon-based capabilities. Game Maker also has its own full-featured scripting language known as the Game Maker Language or GML, which allows you to create more advanced games.
Game Maker provides an object-oriented programming environment in which you define objects representing different characters and objects that make up computer games. GML lets you exercise great precision over the ways these objects interact with one another and various events that occur during game play. GML is an interpreted programming language that is syntactically similar to programming languages like C, C++, and Pascal. As an interpreted language, GML statements are converted into an executable format every time programs are executed. This differs from compiled programs created by other programming languages in which program code is pre-compiled into an executable format, allowing programs to start executing the moment they are loaded. Game Maker automatically includes its interpreter, the program responsible for converting code statements into an executable format, as part of every executable game. As a result, interpreted programming languages like GML execute a little slower. However, given the power of modern computers, GML’s interpreted execution tends not to pose much of a restriction on game development.
GML supports all of the programming features found in any modern programming language, including things like variables, arrays, conditional logic, loops, etc. As such, learning GML provides excellent preparation for other languages like C++ and Java, which are programming languages used by the gaming industry to develop some of the world’s most popular games. You will learn about GML and how to use it to support the development of different kinds of games in Chapters 8 through 11.
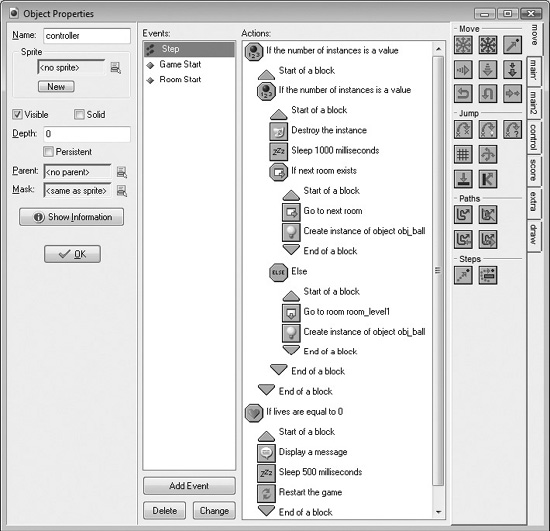
Game Maker supports a drag-and-drop approach to game development that aids beginning game developers. It allows developers to drag-and-drop different icons representing different actions that can be taken, assigning them to different events belonging to the objects that make up the game. As demonstrated in Figure 1.3, you can develop the logic needed to create your games by arranging
Figure 1.3
An example of how event and action icons are used to outline an object’s programming logic.
event and action icons into logical collections, instructing Game Maker how you want the objects to behave.
Through the arrangement of different event and action icons, Game Maker is able to support the same basic types of programming techniques and constructs used in computer programming languages. Game Maker supports the use of variables, iterative and conditional logic, as well as event-driven programming. It also supports the manipulation of graphics and the integration of sound effects and music. It can even play video files.
Game Maker specializes in the development of 2D computer games. This means that you can use it to create games like Pac-Man, Asteroids, and a host of related arcade-style games. However, there is no end to the different types of 2D games that you can create. Although 3D games represent the current state of the art in computer game programming, new 2D games are being released all the time, including such titles as Odin’s Sphere, Super Street Fighter Turbo, and the Command & Conquer series.
Taking advantage of Direct3D, a component of DirectX, Game Maker Pro edition also provides limited support for 3D graphics, supporting 3D particle effects like clouds, rain, explosions, and snow. Though not designed to create 3D worlds, you can incorporate 3D graphics in 2D games, generating games that look and feel like 3D games, and 2D games are a lot easier to create.
Before starting Game Maker’s install process, make sure that your computer’s software is up to date, which you can do by clicking on Start > All Programs > Windows Update and then running the Windows Update process.
As I mentioned previously, Game Maker depends on DirectX to support various graphic and audio operations and requires that DirectX version 8.0 or above is installed on your computer and on any computer that runs the games you create with Game Maker. The good news is that DirectX has been around for some time and any computer that meets Game Maker’s minimum hardware requirements will most likely have DirectX installed.
Hint
However, if necessary, you can download DirectX from Microsoft’s DirectX web page located at http://www.gamesforwindows.com/en-US/AboutGFW/Pages/DirectX10.aspx.
Game Maker’s installation package is available as a free download at http://www.yoyogames.com/gamemaker/try. To start the download process, click on the DOWNLOAD GAMEMAKER 7 HERE button located at the bottom of the page. Click on Save when prompted for permission to continue the download and then specify the location on your computer where you want to save Game Maker’s installation package and click on Save. The download will begin and should only take a few moments if you are using a high-speed Internet connection. Once completed, click on Close to complete the process. Go to the location you specified as the destination location for the download and you should see a file named gmaker.exe.
Game Maker installs on Microsoft Windows like any other Windows application. The following procedure outlines the steps involved in completing Game Maker’s install process.
1. Double-click on the gmaker.exe file.
2. If a security message is displayed, clicked on Allow to give permission for the installation process to continue.
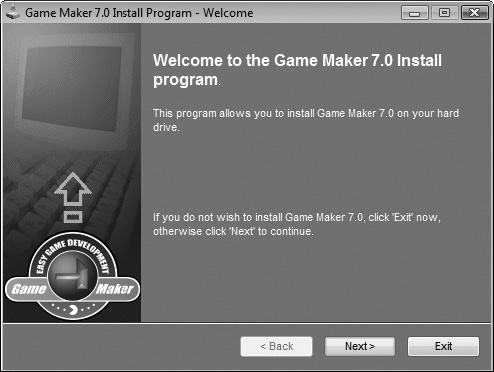
3. The Game Maker 7.0 Install Program Welcome window will then appear as demonstrated in Figure 1.4. Click on Next to continue the installation process.
4. Information about Game Maker, its requirements, and how to upgrade to the Pro edition is displayed. Click on Next to continue.
Figure 1.4
Installing Game Maker on Microsoft Windows.
5. Game Maker’s license agreement is displayed. Read the agreement, select the I agree with the above terms and conditions radio button, and click on Next to continue.
6. The next screen shows the default location where Game Maker will be installed (C:\Program Files\Game_Maker7). Unless you have a reason to change this location, leave it as is and click on Next to continue.
7. A popup window will appear stating that the specified destination directory does not exist. Click on Yes to create it.
8. The install program now has all the information needed to install Game Maker. Click on Start to install Game Maker.
9. Once the install process has finished copying Game Maker’s program files to your computer, its closing installation screen prompts you to view Game Maker’s Readme file. When you are done, click on Exit to close the install program.
Game Maker will automatically start when its installation process is complete. The first time Game Maker starts, it will prompt you to run it in either Simple or Advanced mode. When prompted, click on Yes to run Game Maker in Advanced mode. You will then see the Upgrade to the Pro Edition window shown in Figure 1.5.
Figure 1.5
Unless you upgrade to Game Maker Pro edition, you will see this window every time you start Game Maker.
In addition to starting Game Maker, the installation process also adds a shortcut for Game Maker to the Windows desktop. You will also find a new menu entry for Game Maker on the Windows Start menu (Start > All Programs > Game Maker 7 > Game Maker).
Game Maker supports two modes of operation: Simple and Advanced. Simple mode displays fewer features, reducing, for example, the number of toolbar buttons and menu commands, leaving only those buttons and commands that are required to create basic applications. In Advanced mode, all of Game Maker’s features are made available to you.
Beginners may find that running Game Maker in Simple mode helps to make things easier to manage. However, the differences between these two modes are not that significant. So, for the sake of simplicity, all of the figures and examples that you will see in this book assume that you are working in Advanced mode.
The first time Game Maker starts, it will prompt you to enable Advanced mode. Click on Yes when prompted. Otherwise, click on No to run Game Maker in Simple mode. If you change your mind later, you can switch from Simple mode to Advanced mode by clicking on File > Advanced mode. Likewise, you can switch from Advanced mode to Simple mode by clicking on File > Simple mode.
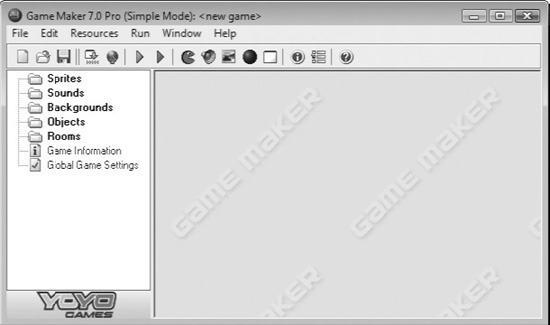
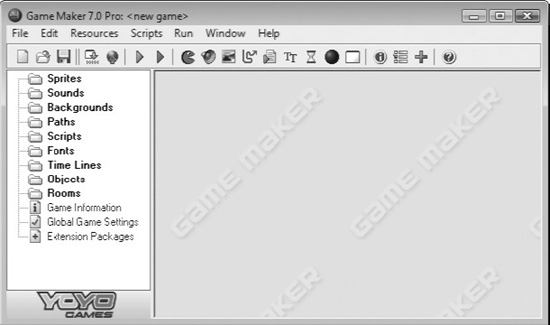
Figures 1.6 and 1.7 demonstrate the differences in the way the IDE looks when run in Simple and Advanced modes.
To take advantage of all of Game Maker’s features, you must upgrade from Game Maker Lite to Game Maker Pro. Until you upgrade to the Pro version, each time you start Game Maker, the Upgrade to the Pro Edition window will be displayed, as shown in Figure 1.5. You can close this window and continue working with Game Maker by clicking on the Don’t Upgrade Now button. You can access this window any time you want by clicking on Help > Upgrade.
Upgrading to Game Maker Pro provides you with numerous features, including:
The Game Maker logo will no longer appear in your games.
You can extend Game Maker’s capabilities using extension packages.
You can create multi-player network games.
Figure 1.6
In Simple mode, Game Maker games consist of sprites, sounds, backgrounds, and rooms.
Figure 1.7
In Advanced mode, Game Maker adds the ability to include paths, scripts, fonts, and time lines to your games.
You can add special sound effects and create particles like rain, snow, and explosions.
You can add custom splash screens, including images, text, and even movie clips to your applications.
You can access new actions for playing CD music.
You can add transitions to your games for when it moves between rooms.
You can include additional files needed to run your games within your game executable (.exe) files.
You can perform a number of advanced drawing functions like textured and colorized shapes.
You get access to a collection of advanced drawing functions supporting 3D game development.
The Upgrade to the Pro Edition window will disappear.
To upgrade from Game Maker Lite to Game Maker Pro, click on the Purchase Online button located on the Upgrade to the Pro Edition window. When you do, your default web browser is used to connect to a web page at the YoYo Games website where you can use your credit card or PayPal to pay for the upgrade. Once you have completed the transaction, your copy of Game Maker is automatically upgraded to the Pro version. In addition, you will receive an e-mail with your registration code, which you will want to save, just in case you ever need to reinstall Game Maker.
Hint
Game Maker Pro edition provides considerably more functionality than the Lite edition. Given the Pro edition’s modest $20 cost, it is well worth the cost to upgrade from Lite to Pro.
As listed next, Game Maker games are made up of collections of different resources. You will learn how to work with all of these resources as you make your way through this book.
Sprites. Two-dimensional bitmap images drawn on a transparent background that are used to represent objects during game play. For example, in a Pac-Man game, sprites would be used to represent Pac-Man and the ghosts that chase him. Sprites can consist of any number of images that are used to generate animation.
Objects. A logical representation of an item in a computer game. Objects provide the basis for creating things like ships, tanks, monsters, etc.
Instances. The representation of an object within a computer application. One or more instances can be created for each object in a game. Instances are generally, though not always, represented by sprites.
Scripts. Collections of code statements that outline the programming logic that controls the operation of object instances within games.
Rooms. An area within a game where sprites interact with one another as the game is played.
Backgrounds. A graphic image used to decorate a room and provide it with appropriate background scenery. Backgrounds can be tiled or stretched as necessary to fill a room.
Sounds. Audio files (wave and midi files) played when events occur during game play or played as background music in order to provide the game with appropriate atmosphere.
All Game Maker games are made up of two-dimensional rooms. A game can be played within a single room or may consist of multiple rooms. When multiple rooms are used, each room may serve as a different area in the game world where game play can occur. Rooms can also be used to provide different levels in which players advance to the next level after completing the current level.
Objects represent the heart of every game. Objects are used to define game resources like characters, vehicles, and all of the other things in games that interact with one another. In order to populate a game world, you must add instances of objects to the game’s rooms. Most of the objects you add to your games will be represented by sprites, making them visible to players. You can create sprites using Game Maker’s built-in sprite editor. Alternatively, you can use another paint program or you can download sprites from the internet.
During game play, objects interact with one another. Players can interact with and control objects during game play in one of several different ways, including:
Pressing keys on the keyboard
Moving the mouse and clicking on its buttons
Using one or more joysticks attached to the computer
Objects can also interact and respond to one another. During game play, all kinds of different events are constantly occurring. When you define objects, you specify the different types of events that the objects respond to. In addition, you can specify the different types of actions that objects should take when specific types of events occur.
You can populate game worlds with as many instances of different objects as you want, each of which act and behave in the manner you defined. In addition to populating the game world with different objects, you can add different backgrounds to rooms and add sound effects and music to your games.
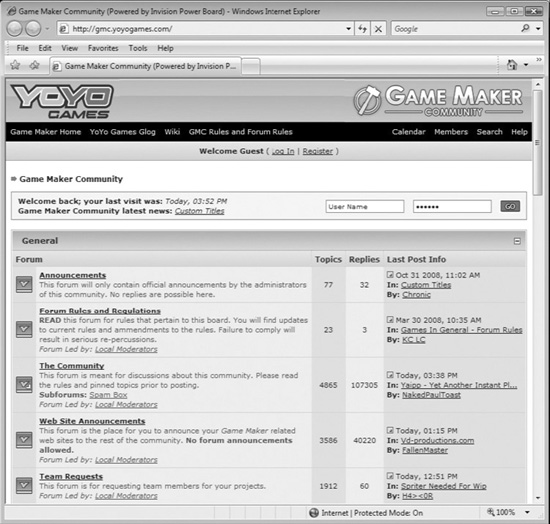
Game Maker is supported by a large community of game developers from around the world. YoYo Games facilitates sharing and communications among these individuals by sponsoring a collection of forums on its website (http://gmc.yoyogames.com), as shown in Figure 1.8.
The forums available on the YoYo Games website are organized into four categories, as shown here.
General. These forums are used to post announcements, introduce Game Maker websites, discuss community topics, and to solicit help with projects.
Working with Game Maker. These forums support communication about tutorials, 3D game development, and how to extend Game Maker’s capabilities. They also facilitate discussions between novice and intermediate users and between advanced users.
Games. These forums provide a place to talk about individual game projects, work in progress, new game ideas, as well as how to distribute your games.
Figure 1.8
The YoYo Games website provides a central location where members of the Game Maker community come to learn from one another.
Resources. These forums sponsor communications about where to find graphics, sound, and music for your games.
As of the writing of this book, the Game Maker community consisted of over 78,000 active users who had made more than 1.7 million postings. You should take advantage of these forums to interact with other Game Maker developers and to keep an eye on the latest developments and happenings. You can learn a lot about game development in general and Game Maker specifically through these forums. You can also post questions and ask for help when you run into problems that you are unable to solve yourself.
In addition to sponsoring numerous forums, the YoYo Games website also provides access to all kinds of useful resources designed to assist game developers. This includes providing access to Game Maker documents and tutorials. It also provides access to collections of sprites, backgrounds, tiles, sounds, music, scripts, and other resources that you can use when creating your own computer games.
Creating new computer games is fun, but sharing what you have created with others can provide even more satisfaction. Let’s face it, people really like to share. How else could you explain the massive popularity of websites like youtube.com that allow people to upload and share their video creations? The result is an exchange of ideas and creativity on a global scale.
Sharing is also an important part of the Game Maker game development experience. Game Maker games can be run on Windows computers, and they can be executed online at the YoYo Games website, provided you download and install a free plug-in. You can make your games available for download. If you want, you can even make your game’s source code available.
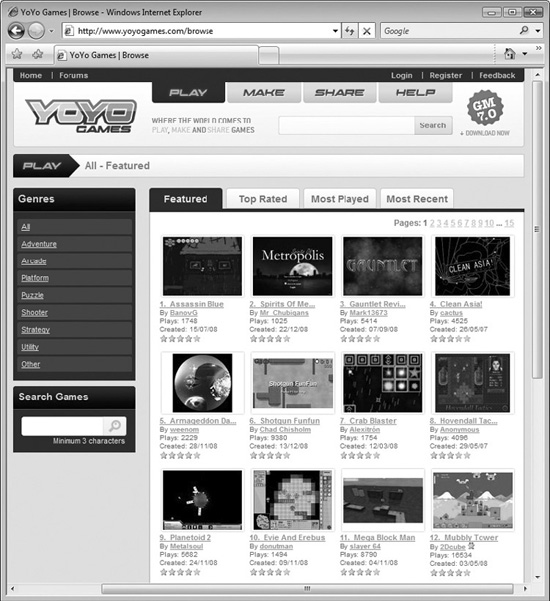
You can read and add comments to any games posted to the YoYo Games websites. You can use the feedback provided by others to help improve your games, by incorporating their suggestions and eliminating or improving features that nobody seems to like. Figure 1.9 provides an example of how games appear when on the YoYo Games website.
Note
You will learn how to share your Game Maker games when you get to Chapter 13, “Sharing Your Game Maker Projects Over the Internet.”
In order to join the Game Maker community, you first need to register with the YoYo Games website by signing up for a free account. Once you do this, you can begin participating in forum discussions and start sharing your games.
Figure 1.9
The YoYo Games website helps promote community member’s games by providing a global audience.
Registering for a new account only takes a couple of minutes. The steps you need to follow are outlined here:
1. Go to http://www.yoyogames.com.
2. Click on the Register link located in the upper-right corner of the web page.
3. Fill in the required form and click on the Register button located at the bottom of the web page.
4. Within a few minutes you will receive an email welcoming you to YoYo Games. In it you will see a link that you must click in order to confirm your registration. As soon as you click on the link, your new account will become active.
As soon as you complete this procedure, you can return to http://www.yoyogames.com/user/login and log in, as demonstrated in Figure 1.10.
A number of sample games are loaded on your computer as part of Game Maker’s installation. As your first foray into working with Game Maker, let’s learn how to start it and then use it to run one of these games. Start Game Maker
Figure 1.10
Registering and logging into the YoYo Games website is the first step in joining the Game Maker community.
by clicking on Start > All Programs > Game Maker 7 > Game Maker. Game Maker’s integrated development environment (IDE) will appear.
Once started, you can load and run any of Game Maker’s sample games by executing the following procedure, which demonstrates how to run a game named Treasure.
1. Click on File > Open. The Load a Game dialog window appears.
2. By default, a list of sample game projects provided with Game Maker is displayed. Locate and select the file named treasure.gmk and click on the Open button.
Hint
Games created using Game Maker 7 are assigned a three-character file extension of .gmk.
3. The game project is loaded into Game Maker, allowing it to be edited and executed. To run it, click on Run > Run Normally or click on the green Run the Game button located at the top of the IDE on Game Maker’s toolbar.
4. Within a few moments you’ll see Game Maker’s default splash screen appear, as demonstrated in Figure 1.11.
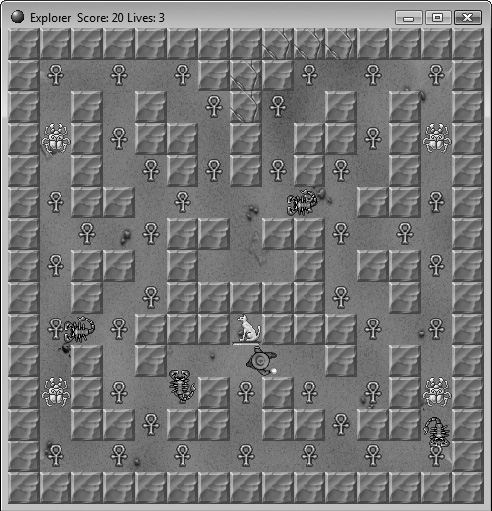
5. A moment later the splash screen will close and the game will begin executing, as demonstrated in Figure 1.12.
To play, you must use the keyboard’s arrow keys to move a treasure hunter around the game, collecting treasure and evading or killing poisonous scorpions. You can display instructions for playing the game at any time by pressing the F1 key, and you can stop game play whenever you want by pressing the Escape key.
If you look closely, you’ll notice that the game automatically keeps track of the number of points scored and the number of lives you have left. By default, you begin with three lives. At the end of the game, which occurs when you have run
Figure 1.11
You can replace this splash screen with a customized splash screen of your own.
Figure 1.12
Treasure is a multi-level Pac-Man styled maze game.
out of lives, a high score window is displayed. If all this seems pretty cool, it is. If you want to learn how to create games like this yourself, keep reading.
Once you are done playing, close the game. To do this, press the Escape key or click on the Close icon located at the top-right corner of the game window. The Game Maker IDE should reappear. Ifyou are done working with it, you can close it by clicking on File > Exit (or on the IDE’s Close button).
This chapter provided a broad understanding of Game Maker and its capabilities. This included a review of its major features and capabilities. You learned how to install it and use it to open, compile, and execute a game. You were also introduced to the YoYo Games website and its support for the Game Maker community. You also learned how to sign up for a free user account and the importance of becoming a participating member of the Game Maker community.